
Here’s your comprehensive guide to resolving merge conflicts in GitHub using Visual Studio Code:
A Comprehensive Guide to Resolving Merge Conflicts in GitHub Using VS Code
Merge conflicts are a common occurrence when working on collaborative coding projects in GitHub. These conflicts arise when multiple contributors make conflicting changes to the same file, making it essential to understand how to resolve them effectively. In this guide, we’ll walk you through the process of resolving merge conflicts using the popular code editor, Visual Studio Code (VS Code).
Table of Contents
Understanding Merge Conflicts
Before we dive into the resolution process, let’s first grasp the concept of merge conflicts. A merge conflict happens when Git, the version control system that underlies GitHub, is unable to automatically merge changes made to a file due to conflicting alterations by different contributors. This typically occurs when:
- Simultaneous Edits: Two or more contributors make changes to the same section of code simultaneously.
- Deleted or Renamed Files: One contributor deletes a part of the code or renames a file while another contributor modifies the original.
Identifying Merge Conflicts
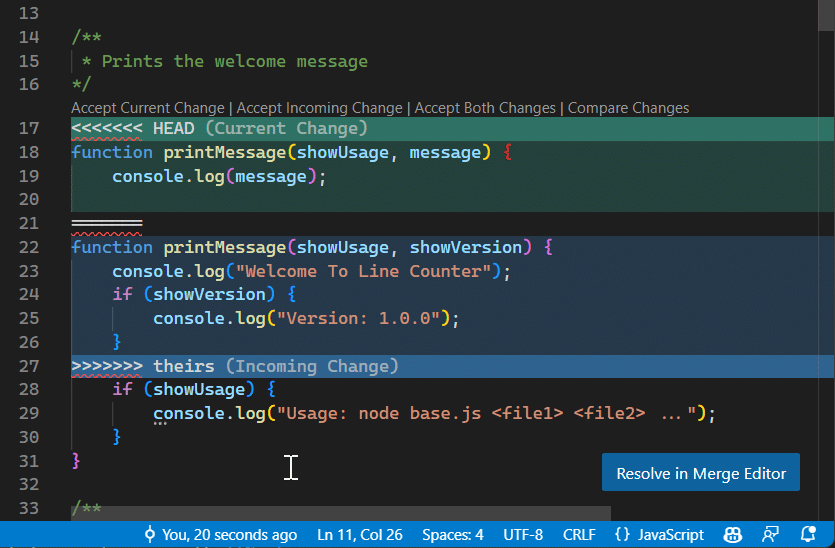
The initial step in resolving merge conflicts is identifying them. When a conflict occurs, Git marks the problematic file, indicating where the conflict has arisen. You will see special markers like <<<<<<<, =======, and >>>>>>>, which highlights the conflicting changes.
Resolving Merge Conflicts using VS Code
Now, let’s proceed to resolve merge conflicts efficiently with Visual Studio Code:
1. Open the Conflicted File
- Open VS Code and navigate to your local repository.
- Locate the conflicted file in the repository.
2. Edit the File
- Open the conflicted file in VS Code.
- Inside the file, you’ll find the conflicting changes separated by the conflict markers (
<<<<<<<,=======, and>>>>>>>). - Manually edit the file to decide which changes to keep and which to discard. Remove the conflict markers.
3. Save the File
- After making the necessary adjustments, save the file in VS Code.
4. Stage the Changes
- Open the Source Control panel in VS Code and stage the conflicted file.
5. Commit the Changes
- Commit the changes by adding a commit message explaining the resolution.
6. Push the Commit
- Push your commit to the GitHub repository to apply the conflict resolution.
7. Verify Conflict Resolution
- Confirm the successful resolution by reviewing the repository’s history and ensuring that the changes are as intended.
3-way merge editor
To help you resolve merge conflicts, VS Code provides a 3-way merge editor where you can interactively accept incoming and current changes and view and edit the resulting merged file. The 3-way merge editor is opened by selecting the Resolve in Merge Editor button in the bottom right corner of a file with Git merge conflicts.
The 3-way merge editor displays separate views for Incoming changes (on the left), Current changes (on the right), and the Result of the merge (at the bottom). Conflicts are highlighted and can be resolved by using the CodeLens buttons.
Resolving conflicts
The 3-way merge editor allows you to resolve conflicts by accepting either one or both changes. You can also manually edit the result of the merge.
For some conflicts, the merge editor shows an Accept Combination button. Accepting the combination resolves the current conflict by smartly merging both changes. This is especially useful for changes in the same line that don’t touch the same characters.
Use the Ignore buttons to accept neither the incoming nor current change, but mark the conflict as resolved. This resets the conflicting area to the state before any changes were made.
Completing the merge
You can use the conflict counter in the right of the result editor to keep track of how many unresolved conflicts are remaining. Clicking on the counter jumps to the next unresolved conflict. Once all conflicts are resolved, you can complete the merge by selecting Complete Merge in the bottom right corner. This stages the file and closes the merge editor.
Additional Tips
To facilitate a smoother conflict resolution process, consider the following tips:
- Regular Communication: Maintain clear communication with your team to minimize conflicts by sharing updates and changes effectively.
- Branch Management: Work on feature branches to isolate your changes from the main branch until they are ready to merge.
- Pull Latest Changes: Always pull the latest changes from the main branch before making your own alterations to reduce the chances of conflicts.
Conclusion
Merge conflicts are a natural part of collaborative coding on GitHub, but with the right tools and techniques, such as Visual Studio Code, you can navigate and resolve them with confidence. By following these steps and embracing best practices, you’ll keep your coding projects on track and your team working harmoniously. Happy coding!
to tackle merge conflicts with confidence and keep your coding projects on track. Happy coding!

